Ok now trim/sand and even it out! You can use a rasp or a barrel sander attachment on a dremel:
A file will help you get straight lines!
Be sure to sand the inside! You will need to even out the inside with dremel or sandpaper so the visor can sit more flush to the inside of the helmet. I like to use skateboard grip tape to sand since it is super tough and gritty enough to chew through the urethane quickly.
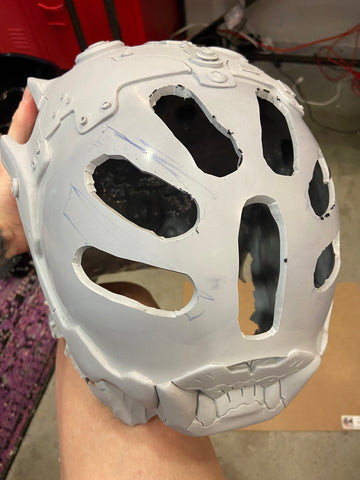
Don't forget to cut out holes! The more holes, the better you can breathe!
Ok now put the bubble visor into the helmet and make some marks so you know where the visor will show through. i like to line it up so there is a little nose hole at the bottom.
Also make marks where you will cut, mine are the straight lines you see in the photo below. Always be cautious and cut less than you need at first, you can always cut more!
I use the cutting attachment on my dremel. The plastic will be HOT and will fly off so please be careful!
Lip has been cut off! Now to measure it in the helmet one more time and see how it sits...
I had to go back and flatten the inside a bit more to get the visor to sit in the helmet correctly. It is normal to have uneven lumps and bumps in these casts since they are slush cast!
I test fit the visor again. Be sure to get the middle to line up so it sit evenly in the helmet!
I drilled a hole in the middle of the helmet and made a mark on the visor where it needed to line up. I started with the middle hole so it is easier to line everything up as you drill more screw holes...
This hex screw/nut will keep it in place while i drill holes through the helmet and visor. I use the SET A from this listing, usually the M3 x 10 or M3 x 12 size.
Use heat to flatten, shape the lip of the visor to the bubble helmet as you drill so that it all fits together well ( this is why you want to flatten uneven surfaces on the inside of the helmet with a dremel first)
Keep adding screws so the visor is held in! You can now remove the screws to paint the helmet and reinstall the visor later!
-You can add helmetliner kits to make this helmet fit better. Buyer may also need to remove the back panel and add elastic so that the helmet can fit ( see bottom of page).
- I also use a quick release latch on the under chin with 1" nylon straps installed with loops similar to how I attach straps to masks ( minus the elastic slide in this case)
I would definitely install fans to keep the visor from fogging! You want one fan that will blow across your face/inside of the visor and one fan blowing out of the helmet. I placed the blow out fan near my jaw/ear. I like this guy's kit if you want something pre-made. I recommend velcroing the battery pack to the top of the inside helmet so it can be removed for battery changes, add some upholstery foam/helmet liner where your head touches it for comfort. Also velcro the fans in case you want to reposition them in the helmet. If you know how to do electronics yourself, these fans worked well with a AA x 4 battery pack.
ADDING A HELMET LIP:
This will help the visor look more finished! I used a 6mm plastic aquarium tube, taped it to my table and warmed it with a heat gun. Carefully cut down the middle ( not all the way through! Just cut halfway, do not bisect the tubing) with a fresh exacto blade and place the opened cut tube over the lip of the visor. Tape in place and warm it again so that it will set in the shape of the visor. It should stay on by itself once installed but you may need to use some plastic glue on the inside to hold the tube ends down:
You can also skip the visor entirely! Just cut some holes to see out of and insert some visor film behind them. I used some finger tape to place the shapes and then cut with an exacto:
Clean it up with a dremel barrel sander attachment:
SIZING!
This helmet was sculpted over a female head form so folks with larger heads may have trouble getting it to fit. You can solve this by cutting the back panel off and using flat elastic glued to the inside ( to connect the panel to the helmet) to let it flex open to get over your head. The red marks are where I would cut: