SPACE CAT ROBOT BLANK KIT *** PREORDER- 4-8 WEEK PRODUCTION TIME***
Regular price
$250.00
Sale price
$0.00
Unit price/per
THIS IS A PREORDER, THIS WILL NOT SHIP FOR 4-8 WEEKS.
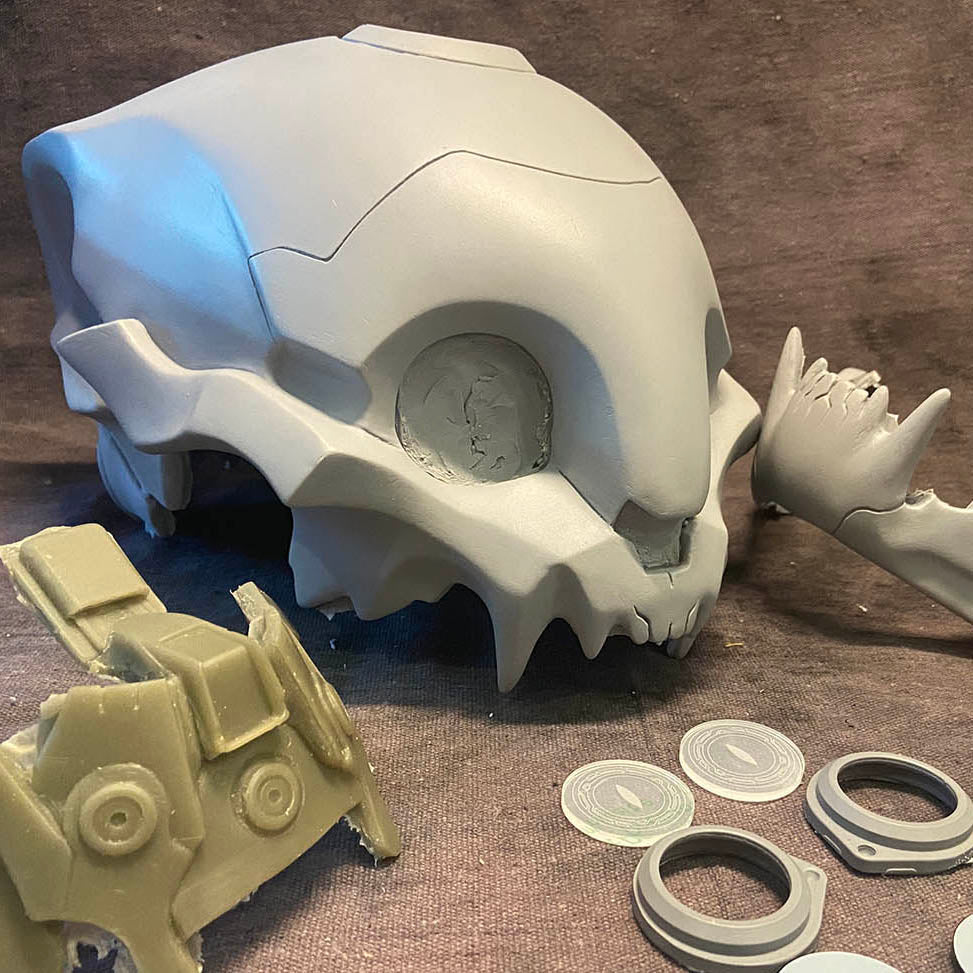
This kit consists of one (1) top head piece, one (1) jaw, one (1) flexible back panel, two (2) cast eye bezels, two (2) clear etched acrylic lenses and two (2) clear tinted acrylic lenses.
The photos of the finished mask are just an example of what this kit can look like. That piece is not for sale and does not reflect any extra items included in this kit.
The acrylic lenses were designed and cut/etched by illumicyberwear. They will come with protective film, please peel this off once you are ready to install. Buyer can choose to use the clear acrylic only or layer the dark lens behind the clear so your eyes can't be seen in the mask. This will make the vision darker and can make seeing in dark areas more difficult.
Buyer can also light the acrylic eyes with LEDs, i used Adafruit sequins and a coin cell battery holder. This is not something provided with the kit and I do not have a tutorial on how to make this.
The wearer's face can be concealed by using a stretch gauze mesh glued to the inside of the jaw/ears. You can also use a balaclava but i ran into mobility problems with a hinged jaw since the hood made everything fit too tightly and the jaw pulled down the hood when i talked.
For cutting out the top casts eye sockets and trimming flash from edges, please refer to this tutorial.
This is a smaller sculpt, meant to be very proportionate to my own head ( 22.5" around). There is a little room for battery packs and padding but it's snug. Larger heads should consider cutting it into parts and installing elastic panels inside to flex - it's mostly the curvature of the back and the way the piece behind the molars, under the ears curves in so much that makes it tight- these could be trimmed and resculpted to fit a larger head.
The flexible back panel can be painted once it has been primed with a spray- I highly recommend Citadel Primer I also recommend using a flexible adhesive like Black Panther to secure it, please refer to the tutorial at the bottom of this listing.
***This is a blank mask cast, there will be a 4-8 week wait before your order will ship.***
Buyers will receive a fulfillment notification through the email provided by the buyer during purchase once the mask has been packed. A tracking number will be sent once the mask is on the way! Please check your spam filters and make sure you are checking the correct email account! Any production delays will be mentioned on the updates page.
The basics:
-This is for a cast urethane unpainted, unfinished mask kit. The finished pictures are just an example of what can be done.
- These are produced one at a time in my own studio. The buyer will need to sand/remove the flash edges, fill any small surface air bubbles, reinforce areas and heat to shape the mask to fit their own face if needed.
- Elastic straps can be attached with high heat hot glue, epoxy or other strong adhesive. Clamp while curing /drying to secure the bond better. Score ( roughen) the inside mask's surface before gluing.
- A plastic nipper, a rasp , sandpaper or a dremel can be used to refine edges. Here is a little more detailed info. Buyer can add upholstery foam for comfort and fit. Some craft/paint/kit building knowledge is recommended. I cannot provide build help beyond the info included here and in links provided.
- Please be sure to provide the correct address when placing your order, all orders will be shipped to the address im provided with and cannot be changed after the order is placed. No exceptions, sorry!
- There are no refunds on pre-orders.
- Please do not buy a mask if any of the above is an issue!
- You will receive a BLANK urethane mask. The finished photos are just an example of what the mask can look like when completed.
- This is not a piece of safety equipment, this is a wearable prop. Please use common sense when wearing these!
- This mask can be primed with any spray primer and painted with acrylics or whatever you prefer. Seal with clear coat to prevent scuffs after painting.
- This urethane is sensitive to heat. Please keep it out of direct prolonged sunlight as it can warp under it's own weight when hot.
-If the mask does not fit or deforms from bearing it's own weight for too long, use a heat gun/hairdryer to heat and soften the back and front to soften the urethane until pliable. Pull gently to shape. Set the shape you want by immersing the warm mask in cold water or leaving on an upturned bowl or object to hold the desired shape while it cools.
- I recommend displaying these masks on a paper towel holder or motorcycle helmet display or a hat display to prevent warping that can occur from bearing it's own weight during long term display. If storing, please use bundled cloth/foam/paper inside the mask to support the shape.
- This is a project that should be attempted by adults or under adult supervision. Please read all safety warnings on materials you use. I am not responsible for any injuries sustained while customizing these masks.
-This mask fits most faces but a perfect fit is not guaranteed.
- Do not use this as safety equipment or a welding mask or anything else but costuming. I am not responsible for injuries sustained through improper use of this mask.
By purchasing this you acknowledge that you have read and agree with the shop's policy page and have read and agree to comply with all of the information on this page.
TUTORIAL:
There may be a gap where the flexible panel meets the rigid cast. I glued a piece of flexible fabric behind the two to conceal it while allowing the parts to still flex when putting on the helmet.
When gluing the bezels into the upper mask eye openings be careful to line up the bezels so they point forward and not at angles in the sockets- otherwise you will have a goofy wall eyed effect once you add the lenses. Also be mindful about the pupils pointing vertically, if they are cocked at an angle this can also give a funny effect to the eyes.
choosing a selection results in a full page refresh